When Life Hands You Lemons, Make This
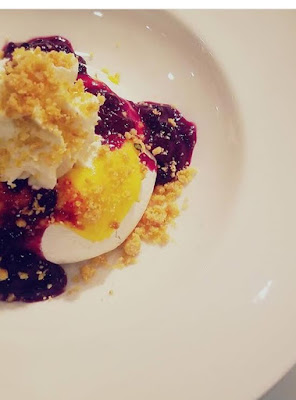
my lemon pavlova w/ blueberry compote and cornmeal crumble
Let me be the first to tell you how annoying complicated recipes are. There’s nothing worse than seeing a drool worthy picture of decadent pie and then skimming the recipe only to realize I was supposed to make the dough ahead of time b/c it needs to chill and the pie should set for at least three hours, preferably overnight, so let me just hop in my time machine and start this shiz yesterday. You’d think I’d be more prepared for these scenarios, yet somehow they always throw me for a loop.
So let me preface this recipe by admitting it is a little trickier than most things I post here, mostly b/c of the tools required. You’ll need a mixer, a mesh strainer and a microplane (no, not all the supplies meet the criteria for “M” day on Sesame Street). A mixer is required to get the yolks light and pale, which would take (roughly) a million years by hand. You’ll need a mesh strainer to strain out the zest and any scorched product or curdled yolks, and a microplane to zest your lemons.
I promise you, this recipe is worth the effort. This lemon curd is by far the best I’ve ever had. It’s thick and silky and packed w/ a lemon punch that makes other curds slink away in shame. It lasts for up to two weeks in the refrigerator and freezes like a dream.
It’s perfect for switching up whatever flavor you’re in the mood for. Is key lime pie your all time favorite? Boom, lime curd. Is it blood orange season and you want something to impress your mother-in-law? Blood orange curd FTW. I just changed one of the deserts at work to be more tropical and switched from lemon curd to passionfruit and holy shit is that delicious.
The ingredients are all straight forward: butter, sugar, eggs, lemons and lemon juice. You’ll need four lemons to zest, and if you want to juice those lemons after zesting them, be my guest, but you’ll need more juice than those four lemons will give you, so I’d just buy lemon juice and make it easy on yourself. If you’re doing a non citrus that you can’t zest, like passionfruit, skip the zest. At work, I use 9 ounces of passionfruit puree and it turns out beautifully.
This is a recipe I’d definitely recommend reading through ahead of time and familiarizing yourself with. The butter and sugar needs to be halved, so make sure you have them measured out correctly. It’s best to get your ice bath set up ahead of time so it’s ready when your curd is done. A large pot or Tupperware container works great, something big enough to have ice and ice water in that the container holding the finished curd will fit inside of.
The point I can’t stress enough is near the end, when the curd goes back over the heat, is to keep the heat low and whisk it constantly. This is where it gets tedious, but you can’t rush it. If you turn up the heat, the bottom will undoubtedly scorch and your hard work is gonezo. Keep it low and slow and you will be rewarded for your patience. You’ll start to feel it thicken after several minutes, and once you see any tiny little bubble, pull the pot from the heat.
I hope I haven’t scared you away, b/c this lemon curd is incredible. If you’re reading this like wtf is lemon curd? I have three words for you: lemon meringue pie. I’m a total chocoholic, but lemon desserts get me every time. Do yourself a favor and try this; 4th of July lemon meringue pie, anyone? (check me out, I make sweet fruit curd and dope rhymes)
Lemon Curd
Ingredients:
10.5 oz butter
9 oz sugar
9 oz egg yolks
4 lemons, zested
9 oz lemon juice
Instructions:
1) Combine half of the butter, half of the sugar, lemon zest and lemon juice in a pot over medium heat. Bring to a boil.
2) In a stand mixer w/ whip attachment, whip yolks and other half of the sugar on high until thick and pale yellow, about 3-5 minutes.
3) Once liquid reaches a boil, turn mixer down to low and add liquid in small amounts, whisking between each pour. This tempers the yolk mixture so the eggs don’t scramble. Once it is all combined and tempered, pour it back into the pot.
4) Over low heat, continue to whisk the mixture constantly until it has thickened and starts to bubble. Immediately remove from the heat and whisk in remaining butter.
5) Strain mixture through a mesh strainer and cover w/ saran wrap so it doesn’t develop a skin. Chill in ice bath until cool. Keep refrigerated.

Comments